
How to Take Great Pictures of Flowing Water With Your iPhone
- dougsmith51
- Nov 14, 2020
- 1 min read
Updated: Jan 2, 2021
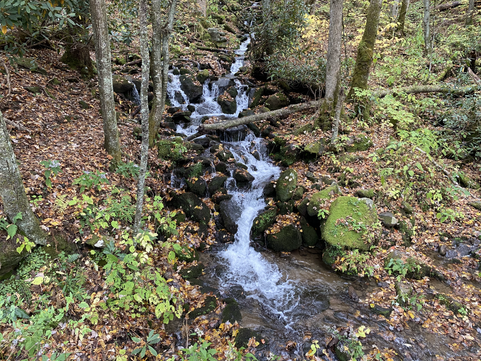
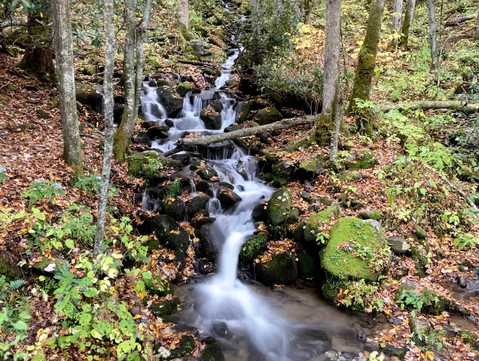
We've received a number of compliments on our pictures of waterfalls and streams this year, especially the pictures where the falls or cascade are misty trails instead of sharp images. Here are a couple of examples of the same scene taken as a snapshot and as a long exposure water flow trail.


While there are apps that can help you create these long exposures, did you know that you can create these yourself using only the native Camera app on your phone? We'll show you how in a few easy steps.
The technique works equally well for waterfalls, brooks, and streams. And you don't even need a tripod!


How to Blur Water Flow
STEP 1: Open the Camera app on your iPhone. Be sure your "Live Photos" setting is on by tapping the icon on the upper right of the viewfinder screen.
STEP 2: Take your shot, being sure to hold your camera steady for the 2-3 seconds it takes a Live Photo shot to complete.
STEP 3: Bring up the photo you want to convert in the Photos app.
STEP 4: Flick up with your finger until you see the word "Effects" and some smaller copies of the image below. Drag over to the right until you see "Long Exposure" and select it, then hit the left arrow at the top of the screen to go back out to photo selection.

That's it!
Please try this technique yourself and let us know how it works for you.
To finish off the blog post, here are a few more examples of this effect from our recent time in the Smokies. We love having the water blurred but everything else in sharp focus!


Comments